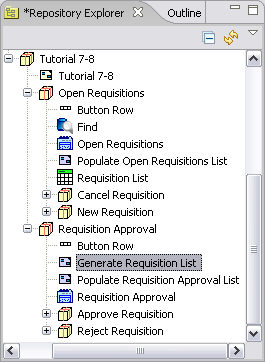
On completion of this stage you should be familiar with the following concepts:
|
Modeling notions: |
Flow errors, Remove Flow |
|
Modeling techniques: |
Filtering retrieved data, Clearing table display, Moving models between packages |
|
Useful process templates: |
Find (with condition), Advanced Find |
In this stage you will fine-tune the two views you have created (Open Requisitions and Requisition Approval).
Currently both views display all requisitions in the database, which is inconsistent with their intended user (and will make them difficult to use as more and more requisitions are entered into the system). Ideally, each view should filter requisitions and display only the requisitions which are relevant to that view:
The Open Requisitions view should display all requisitions except those that have been canceled (i.e., filter requisitions based on the following condition: Status<>Canceled).
The Requisition Approval view should only display new requisitions (Status=New).
This stage’s modeling should be performed in the Tutorial 7-8 project, you imported at the end of the previous stage.
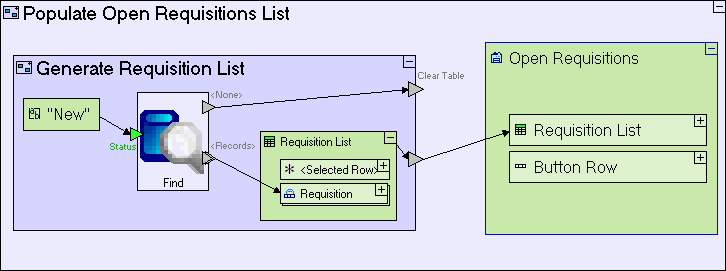
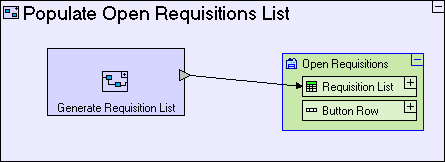
Both views contain a process that populates the requisition list with requisitions.
We shall start with the Populate Requisition Approval List process.
Populate Requisition Approval List is reused in the following locations:
Requisition Approval view
Requisition Approval/ Approve Requisition button
Requisition Approval/ Reject Requisition button
Because of reuse, editing and changing Populate Requisition Approval List in one of these locations, will be sufficient.
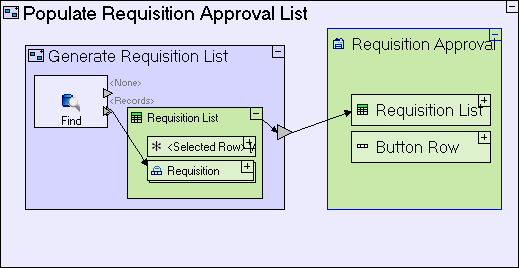
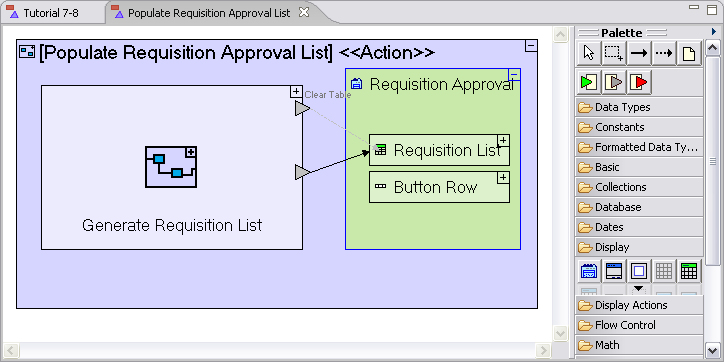
Populate Requisition Approval List currently looks as follows:
We would like the Generate Requisition List sub-process to return Requisitions whose Status is New:
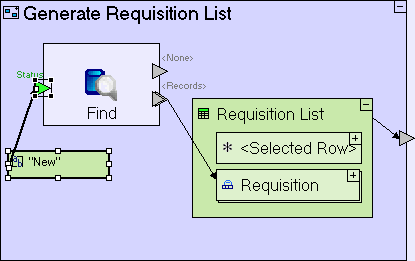
Zoom to Generate Requisition List.
Add a Trigger to Find. Name it (pressing [F2]) Status.
Drag the “New” constant from the repository (or outline) and drop it next to the Status trigger.
We want to reuse the existing New constant in the Submit button of the Enter New Requisition popup.
Create Flow linking the “New” constant to the Find/Status trigger.
The Generate Requisition List process should now look as follows:
When we add a trigger to the Find process and the trigger name matches a field in the table from which the records are retrieved (Status in our case), Find will only retrieve those records where the field contains the value supplied to the trigger (“New” in our case).
For more information regarding Find see the Templates section of the on-line documentation.
Save your work and view the application in the browser.
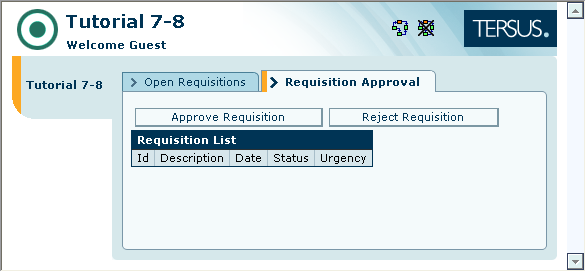
Switch to the Requisition Approval view.
Verify that the Requisition List is now filtered to display requisitions whose Status equals New.
Approve or reject a requisition and verify that it is removed from the Requisition List.
Continue approving or rejecting requisitions until one requisition is left.
If you now, approve or reject the last requisition, you will see that it is not removed from the display (although its status has changed in the database, as can be seen if you refresh the browser display – the table will appear empty).
This occurs because when Generate Requisition List is executed in order to refresh the requisition list, after the last requisition has been approved/rejected, the Find process fails to find any records whose Status=New and therefore exits through its <None> trigger (instead of the usual <Record> trigger). The <None> trigger does not have flow defined from it, and so the process terminates, which means the display is not refreshed.
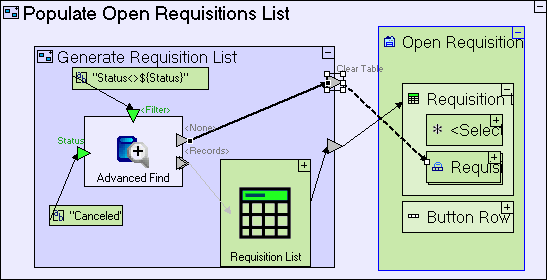
To refresh the display in this case, we need to define flow exiting <None> and use a special type of flow, Remove, which will clear the table display:
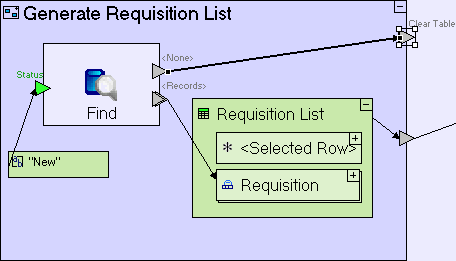
Zoom to Generate Requisition List.
Add an exit slot to Generate Requisition List. Name it Clear Table.
Create flow linking the Find/<None> exit to the Generate Requisition List/Clear Table exit.
The Generate Requisition List model should look similar to the following:
What is left to do in order to clear the display is to add the Remove flow tool, which is used to specify that the flow’s target should be cleared of existing elements (in our case at runtime this will be the single requisition that we have just approved or rejected).
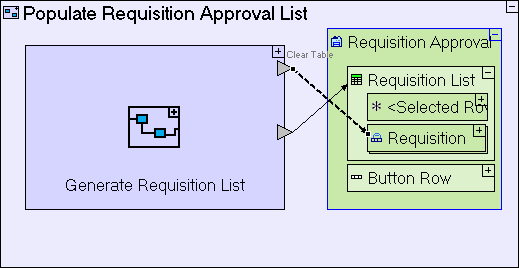
Zoom to Populate Requisition Approval List.
Select the Remove flow tool (![]() ).
Click on the Generate Requisition List/Clear Table exit to
define the source. Click on Requisition Approval/Requisition
List/Requisition database record to define the target.
).
Click on the Generate Requisition List/Clear Table exit to
define the source. Click on Requisition Approval/Requisition
List/Requisition database record to define the target.
The Populate Requisition Approval List model should look similar to the following:
Save your work and view the application in the browser. Verify that in the case of a single requisition appearing in the table, approving/rejecting it clears the table, as in the following screenshot:
Notice that because Generate Requisition List is reused in the Open Requisitions as well it will display the same list of requisitions whose status equals New. We will handle this next.
The Open Requisitions view requires that we implement a different filter: Status<>Canceled.
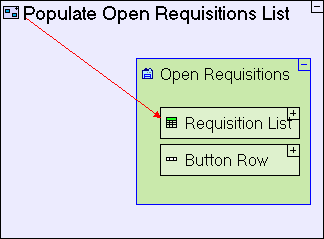
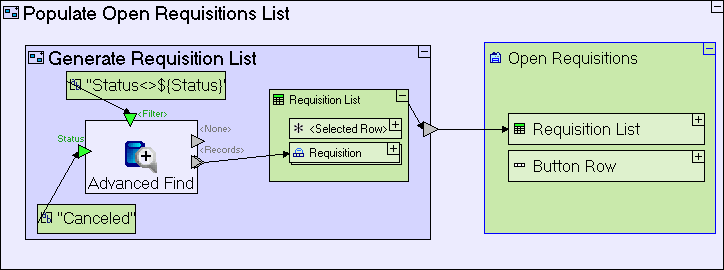
Populate Open Requisitions List currently looks as follows:
We need to update the Populate Open Requisitions List process to implement the different filter, and since the actual filtering is performed in the Generate Requisition List sub-process, which we must not change (as it is used by Requisition Approval), we shall replace the existing process with a new (separate) Generate Requisition List.
Since we are going to recreate (in part) functionality that is already modeled in Populate Requisition Approval List, we can open it in a separate model editor window. This will allow us to use it as a reference for further modeling, switching back and forth between the two windows.
To open Populate Requisition Approval List in a separate window, you can either:
Locate Populate Requisition Approval List in the Repository Explorer, and double-click.
Or:
Locate Populate Requisition Approval List in the Model Editor, right-click it, and select Open in a New Tab
The quickest way to locate a model in the repository is by right-clicking the model in the editor and selecting
Your model editor should now display 2 editor windows; one for the root model Tutorial 7-8 and another for Populate Requisition Approval List, as in the following screenshot:
Go back to editing the complete model:
Click on the Tutorial 7-8 editor tab.
Locate Populate Open Requisitions List (in Open Requisitions) to begin modeling the changes:
Zoom to Populate Open Requisitions List.
As explained before, any of the instances of the model will do (as long as they are the Requisition Approval’s version).
Now remove the obsolete process:
Select Generate Requisition List and delete it.
The model should look as follows:
The flow arrow which linked Generate Requisition List to the Open Requisitions display data element will turn red to indicate a modeling error. We shall deal with it in a moment.
Despite the fact that we deleted the Generate Requisition List process from the Open Requisitions view, meaning it remains in use only in the Requisition Approval view, the Generate Requisition List model remains in the package in which it was originally created, i.e. the Open Requisitions package (verify this by looking in the Model Repository). This has no effect on application behavior in runtime, since packaging is implemented solely for developer convenience, and a model from any package may contain elements from any other package.
There is however one interesting side effect on our subsequent modeling: We next plan to create a new Generate Requisition List model, similar to the existing one, in Populate Open Requisitions List - which means it will be created by default in the Open Requisitions package (the same package as the existing Generate Requisition List model), resulting in a new model called Generate Requisition List 2, which will work just the same, but in order to keep things neat and tidy, we would like to avoid this.
A solution to this is to move the existing Generate Requisition List model to the Requisition Approval package:
Locate Generate Requisition List in the Open Requisitions package (see the screenshot below).

Drag-and-drop Generate Requisition List on the Requisition Approval package.
Now create the alternative Generate Requisition List process:
Drop a Basic/Action template into Populate Open Requisitions List. Name it Generate Requisition List.
Add an Exit slot to the new process.
Select the red flow arrow and drag its source anchor to the new exit.
If you entered all names correctly, the red arrow will reconnect automatically, and the last step above will not be needed.
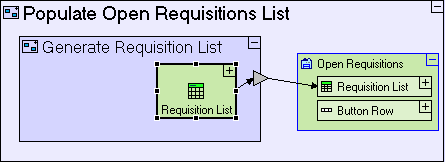
The Populate Open Requisitions List model should look as follows:
Now, let’s model the new Generate Requisition List, by looking again at the existing Generate Requisition List (in the Populate Requisition Approval List process which we opened in a separate model editor window).
We need to add a Requisition List display data element:
Drag-and-drop Requisition List from the repository (or outline) onto Generate Requisition List.
Add flow linking Requisition List to the Generate Requisition List exit.
The Populate Open Requisitions List model should look as follows:
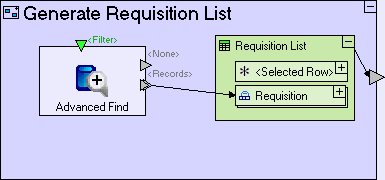
Looking once more at the Populate Requisition Approval List window, we can see that we’re missing the Find process which retrieves data, but as explained earlier, we need to implement a “does not equal” criteria, which is not supported by the Find template. Instead we shall use the Advanced Find template:
Select the Database/Advanced
Find template (![]() )
and drop it in Generate
Requisition List.
)
and drop it in Generate
Requisition List.
Advanced Find is similar to Find in that it has 2 exits, <None> and <Records>, so:
Create Flow linking Advanced Find/<Records> exit to the Requisitions data structure in Requisition List.
Generate Requisition List should look as follows:
We want to filter out records, whose Status is Canceled.
The filter is provided through the <Filter> trigger of Advanced Find, as a text string defining constraints on one or more fields in the table. The constraint in our case should be “Status<>’Canceled’”.
In its simple form, Advanced Find relies exclusively on the default <Filter> trigger, but to provide additional flexibility, triggers can be added which will provide parameters for the filter itself:
Add a Trigger to Advanced Find. Name it (pressing [F2]) Status.
Now the filter can be defined as “Status<>${Status}”, where in runtime, ${Status} will be replaced with the value passed to the Status trigger.
Note the use of the $ sign and {curly} brackets to signify a parameter.
Define the filtering condition itself:
Add a Constants/Text from the palette.
Name it Status<>${Status}.
Link it to the Advanced Find/<Filter> trigger.
And set the parameter of the filter, Status:
Locate and drag the “Canceled” constant (from the Cancel Requisition button) in the repository (or outline).
Link it to the Advanced Find/Status trigger.
For more information regarding Advanced Find see the Templates section of the on-line documentation.
The Populate Open Requisitions List model should look similar to the following:
Save your work and view the application in the browser.
Verify that Requisition List in Open Requisitions does not display any requisitions with status Canceled.
Select a requisition from the list and press Cancel Requisition. The Requisition should disappear from the list.
This demonstrates, again, how reuse works: the changes which have been performed on the Populate Open Requisitions List model in one location (Open Requisitions), also apply to other locations where it is reused (in this case: Open Requisitions/Cancel Requisition).
Import the sample project Tutorial 8-9 and use it as the basis for the next stage of the tutorial.
For a reminder on how to import a sample project, see the Importing a Sample Project section at the end of Stage 2.
This sample project contains all the functionality modeled thus far.
The sample project also includes additional functionality, as follows:
1. Emptying Requisition List display when Populate Open Requisitions List/Generate Requisition List does not find requisitions.
|
How to Model |
Located in |
|
Add exit slot to Generate Requisition List. Name it Clear Table. Link Advanced Find/<None> to Generate Requisition List/Clear Table. |
Populate Open Requisitions List/Generate Requisition List process |
|
Create Remove flow linking Generate Requisition List/Clear Table to Open Requisitions/Requisition List/Requisition |
Populate Open Requisitions List process |
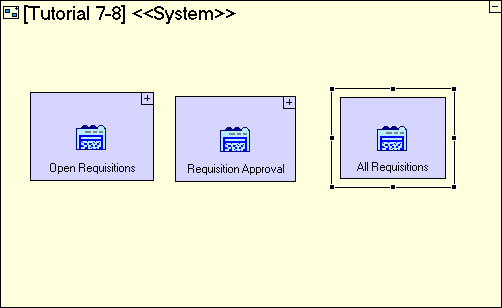
2. Add another view, All Requisitions, which displays all requisitions in the system, regardless of their Status.
|
How to Model |
Located in |
|
Add Display/View. Name it All Requisitions. |
Tutorial 7-8 root |
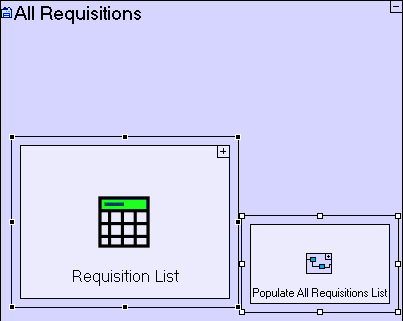
3.All Requisitions view modeling (continued)
|
How to Model |
Located in |
|
Drag Requisition List simple table from the outline/repository. |
All Requisitions view |
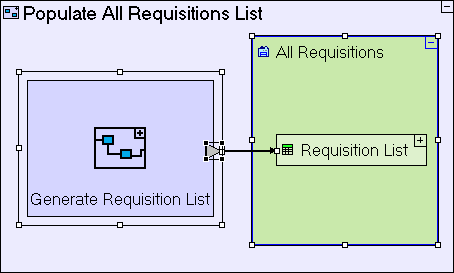
4. All Requisitions/Populate All Requisitions List process modeling.
|
How to Model |
Located in |
|
Add an ancestor reference of the All Requisitions view. Add Basic/Action. Name it Generate Requisition List. Add an Exit to the Generate Requisition List process. Link the exit to the All Requisition/Requisition List data structure. |
Populate All Requisitions List process |
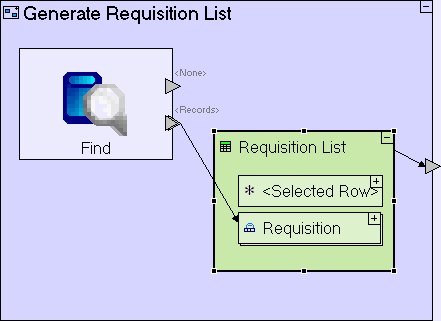
5. All Requisitions/Populate All Requisitions List/Generate Requisition List process modeling.
|
How to Model |
Located in |
|
Add Database/Find. Drag Requisition List from the outline/repository. Link Find/<Records> to Requisition List/Requisition. Link Requisition List to the Generate Requisition List exit. |
Generate Requisition List process |
You may now proceed to Stage 9, in which we are going to visually re-arrange the views we have created so far into groups targeted at the different users of the system.
Click here to open the live project in a separate window.